How to Make Cut Stars in an Hour or Less
Introduction
Cut stars are the simplest and easiest stars to make. They are generally also the cheapest. One can make large quantities of cut stars in a short space of time. Cut stars can be made with or without special tools or equipment. Cut stars can be used in:- shells
- rockets
- mines
- fountains
There are a variety of different ways to make cut stars. Some use a frame specifically designed for cut star making. Other simpler ways dispense with frames entirely. Both methods are discussed here.
Materials & Equipment Needed
The materials needed to make cut stars are dependent on the formula used and on the formula of the prime if a prime is used. The most popular type of prime used is meal powder, which is black powder in fine powder form rather than in granules. It is generally recommended that stars be primed. An exception to this rule is chlorate stars, which usually do not need priming, and are rarely primed with black powder.Some kraft paper is needed to line certain types of star frames. One gallon zip-lock bags are useful if one is mixing just one or two pounds of star mix.
Another useful material is a roll of waxed paper, the type normally found in the kitchen.
The barest minimum one needs to make cut stars is:
- mixing bowl
- mixing spoon or spatula
- rolling pin (if a frame is not used)
- knife
- mallet
- scale for measuring quantities
| The above assumes that a flat, smooth working surface is available. Do not use a knife with serrated edges. Preferably get one large enough to make each cut with a single cleaving (as opposed to slicing) action. A useful addition to the above is a drying screen that need be nothing more than a window screen. Stars dry out a lot quicker on a drying screen than if one just places them on a flat surface. Use rubber gloves as general hand protection against toxic chemicals. Gloves are essential if one decides to knead the star mix by hand. |
Some makers of cut stars do not believe in using something with as sharp an edge as a knife and prefer to use a blunt blade made from a sheet of metal or a tool that is used for plastering walls. You can try these options if you prefer. However, knives with sharp edges do work just fine. |
A 20-mesh mixing sieve is nice to have when mixing the dry ingredients. Although most firework makers consider a mixing sieve to be absolutely essential, I beg to differ with them. A good mix can be got without a sieve but normally takes longer. Sieving can also cause certain very fine powders such as lampblack and bismuth trioxide to agglomerate into tiny balls.
A star frame (or set of frames) is a good investment if you are planning to make large quantities of cut stars. The process is quicker and more accurate with a good star frame.
Before describing the steps in making cut stars, an important consideration needs to be borne in mind: Small is beautiful.
Small is Beautiful
Whether you are a beginner or a pro the clever way to make cut stars using a new untried formula is to make very small quantities in the beginning. These small quantities of stars are tested to determine how well the stars perform before larger quantities are used. One way is to make a small quantity of star mix and burn it in a small lance tube. Another way is to make a very small batch of stars without a star frame, then dry and test these. This method gives a better test but takes a lot longer because the stars need to dry out before use.
Measuring Dry MaterialsAll dry materials are measured by weight, not by volume. Thus if the formula you are using calls for five parts of potassium nitrate and two of sulfur, this could be translated as five grams of potassium nitrate to two grams of sulfur, rather than five teaspoons of potassium nitrate to two teaspoons of sulfur. The gram measurements are given just as an example. Five ounces of potassium nitrate would be mixed with two ounces of sulfur, five pounds with two pounds, and so on.Mixing Dry MaterialsAs discussed above, dry mixing can be done with or without mixing sieves. The goal is to have all the ingredients intimately blended with each other. It pays to do a proper job at this stage of cut star making. Many have made the mistake of assuming that one can compensate for inadequate dry mixing by just taking a bit longer mixing the ingredients when wet. Sometimes this works; other times it does not, depending on the formula used. It is not uncommon to discover small pockets of unmixed dry chemicals in a wet mix that has been mixed for some time. This is a sure indicator that the materials were not mixed properly when dry.Adding Solvent (Water or Other Solvent)Before adding the solvent, you should put aside some of the dry material. This can be used for dusting the surface that the dampened star composition will be cut on. It can also be used in controlling the consistency of the wet mix, especially in the all-too-common situations when too much solvent is added. A good amount to be set aside is about one quarter of the dry mix. This amount can be reduced eventually with more practice. |
Weight vs. VolumeIs there a way to convert weight into volume and measure by volume rather than weight? No, not really. The thought behind converting weight to volume is influenced by the idea that if one knows the density of a material one can easily convert its weight to volume or its volume to weight. This is true of solid pieces of material but not of material that has been reduced to powder or granular form. This does not have a true density because the material is actually a mixture of the material and air. In place of true density such a material has what is called bulk density. Bulk density is a density measure of solids that have been divided into small pieces or crushed into powders. Thus potassium nitrate in powder or granular form has a bulk density, as does sugar and salt. Black powder has a bulk density, and so does instant coffee and corn flakes. |
Add the solvent by slowly pouring or spray-misting it into the dry mix while stirring continuously, or working it in with your hands. Both these actions are important to ensure good mixing. If the solvent is added too quickly or the mix not stirred thoroughly, separation of the ingredients can occur. Here lighter materials will tend to float on the surface of the solvent and soluble materials can be dissolved and separated from surrounding materials.
Mixing Dry and Wet Materials
The trick in making good cut stars is to ensure that the wet mix is neither too dry nor too wet. The consistency should be that of putty or modeling clay. To get to this point, slowly add the solvent while continuing to stir the mix. If too much solvent ends up being added, add some dry material to get the mix back to its proper consistency.Priming
Cut stars are often primed just after they are cut. Many prefer this method because it simplifies the operation. You do not have to prime your cut stars at this stage. You can prime them after they have dried.So much for the general discussion on cut stars. The above is put into practice by actually doing a cut star project. Here is how you go about it.
Making Cut Stars, Step by Step
1. Mixing the Ingredients
Weigh out the dry ingredients to yield approximately one pound of dry mix.Mix the dry ingredients by first sieving (if you have a sieve) and then by stirring them together in a bowl. When the dry ingredients are thoroughly mixed place about 75% of them on a one gallon zip-lock plastic bag. A one gallon freezer bag is ideal. Keep the other dry 25% to one side.
Measure out the solvent used by weight. If you know its density you can measure it by volume and then convert this volume to weight. A rough guide to the amount of solvent needed is between five and ten percent of the weight of the dry ingredients.
Add the solvent to the dry materials in the zip-lock bag.
Knead the materials inside the zip-lock bag by squeezing them with one or both hands as shown in Figure 1.
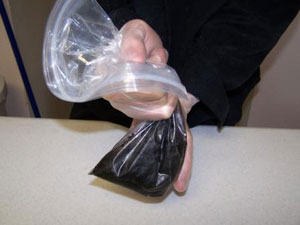
Figure 1 Kneading the Materials
When the material inside the bag is thoroughly mixed take out a small handful for testing. Close your hand around it, and squeeze it. It should hold its shape, and no water should come out between your fingers. If the sample crumbles add more solvent. If it is too wet add some of the dry ingredients you set aside. Note the sample shown in Figure 2 is a bit too wet.

Figure 2 Squeezed Sample
2. Star Making without a Star Frame
Star frames enable you to make cut stars more accurately and can yield stars that are physically stronger because you are able to compress the mix more. However, you can make adequate cut stars without a frame by doing the following:Take the mix out of the plastic bag and place it on some wax paper on your working surface (table, workbench, etc.).
Knead the mix with your hands and form it into one solid lump.
Press down on the mix with the palms of your hands until it forms a large patty about an inch thick.
Roll the mix flatter with a rolling pin until you reach the desired star thickness.
One way you can more accurately get a consistent thickness is to get two strips of wood the thickness you desire and place them on the work surface spaced apart about two inches less than the length of the rolling pin. Place the lump of mix midway between the two strips of wood. Then flatten the lump first with your hands and then with the rolling pin running along the two strips of wood.
Some hardware stores sell square strips of wood in sizes like 1/4" and 3/8" often in the wooden dowels section.
When you have flattened the mix to the required thickness cut the stars according to the instructions in step 4.
3. Making Stars with a Star Frame
This section describes how to use the star frame shown. This star frame has a compression lid that enables you to press the mix by putting pressure on the lid. Star frames that differ from this design will require slightly different methods. But the same basic principles apply to all star frames.Cut two pieces of kraft paper into squares to fit the inside of the star frame. Remove the lid from the frame and place one of the pieces of paper inside the frame so that it lines its bottom. I have used very thick kraft paper here, almost as thick as thin cardboard. If you are using thinner paper then use two sheets to line the bottom.
Remove the material from the plastic bag and spoon it into the star frame. Disperse the material evenly around the frame using either a spoon or a spatula as shown in figure 3. When the materials are properly dispersed, place the other square of kraft paper on top of the material.

Figure 3 Dispersing the Material
Replace the lid of the frame and press down on the frame by leaning on it as shown in Figure 4.

Figure 4 Pressing Down on the Frame
Hammer on the lid with a rubber mallet to compress the material even more as shown in Figure 5.

Figure 5 Hammering the Frame Lid
Remove the lid from the frame and then separate the frame from its bottom. The star mix will be compressed to a flat plate as shown in Figure 6.

Figure 6 Compressed Star Mix
Slide the slab of star mix onto a cutting board as shown in Figure 7.

Figure 7 Moving Slab onto Cutting Board
4. Cutting the Stars
Fireworks makers have their individual preferences when cutting cut stars. Some prefer to immediately slice the slab into strips; others prefer to mark out the strips as equally-spaced lines on the slab before cutting. This second method helps you to get better consistency in star sizes, and is the method shown here in Figure 8.
Figure 8 Marking out the Strips
Continuing the strip marking method, mark the slab into cubes before cutting as shown in Figure 9.

Figure 9 Marking out the Cubes
Finally, cut into individual cubes as shown in Figure 10.

Figure 10 Cutting into Cubes
The above method describes using the star frame with about a pound of mix. This is about enough to make the single slab shown. Using more mix, such as four to five pounds gives you a brick rather than a thin slab. Here you cut the brick into slabs first. This procedure is described in more detail in a later section.
5. Priming the Cut Stars
For most applications, it's best to prime your stars. This section describes the preferred method on how to prime stars. It is the "preferred method" because it is the safest method. It is called the "diaper method."Place the stars in the middle of a large sheet of paper as shown in Figure 11.
Note: Newspaper is often used for this purpose.
Pour some prime mix over the stars.
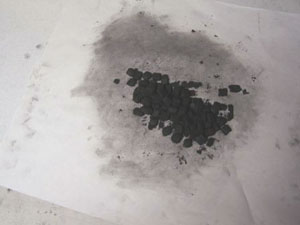
Figure 11 Stars on Paper Sheet
Pick up one corner of the sheet of paper and move it towards the other corner, rolling the stars over in the prime mix in the process as shown in Figure 12.
Repeat this process with the opposite corner and then with the two other corners until the stars are thoroughly coated with prime.

Figure 12 Stars Being Covered with Prime
6. Drying
Having got this far, taking great care to do everything properly, it seems a crying shame that one's cut stars can end up being a dismal flop. Unhappily they can, due mostly to that very common human weakness - impatience. Having made presentable looking stars, you now want to try them out. It can take days to properly dry out stars and there is the natural tendency to want to speed this process up.Most speed-up drying processes have a tendency to degrade the performance of the stars or dry them on the outside while trapping moisture or solvent on the inside. Others are downright dangerous! Do not try to dry stars near an open fire, in an oven, nor in a microwave oven. Do not dry them in direct sunlight, which can trap moisture inside ("driven-in" moisture). Ultraviolet radiation and heat from direct sunlight has caused some star mixes to spontaneously ignite!
The best way to dry stars is to place them on a screen in a shady, well-ventilated area outdoors. What you want is air moving over the stars; heat is not necessary.
Warning: Locate your drying stars in a safe place. If they were to ignite spontaneously, where would you want them to be? The best practice is to try and anticipate what the worst case situation would be and take preventive measures accordingly. I cannot overemphasize this enough: drying stars can and do self-ignite!
 Figure 13 Stars Drying on Window Screen
|
|
Patience is the key to ensuring that your stars dry properly. Typically stars take a few days to dry out. Some large stars that absorb a lot of moisture while being made can take a few weeks of drying before they are properly dried.
7. Testing Dried-Out Stars
How do you know when the stars are dry and ready for use? One way of finding out is to weigh the stars. The total weight of the stars plus any left over dry material and pieces of star scrap should weigh approximately the same as the original dry mix did. While some might put a lot of faith in this method, the real world dictates that this will only get you into the ballpark. Inaccuracies are inevitable because some material will always be lost in the star making process. Another factor is that some pyrotechnic mixes tend to retain a small percentage of the solvent used. A typical example is black powder that can retain between 0.3% and 1% of water. Commercial black powder that I have tested has contained between 0.4% and 1.2% of water.The above two inaccuracies work against each other and it is possible that in certain circumstances they cancel each other out.
A simple way you can test a star to find out if it is dry or nearly dry is to try and crush it between your thumb and forefinger. If the star crumbles easily it is far too wet. If it crumbles only with difficulty or does not crumble at all, the star is either dry or close to being dry.
If your stars have passed the second test, the next step is to place a star on a hard surface and hit it lightly with a hammer until it breaks. Do NOT use a steel hammer as this can cause sparks that could ignite the star. Use a mallet or a hammer made from leather, brass, aluminum, rubber, or plastic. Note than plastic hammers are often steel hammers that are encased in plastic. These are fine to use because the steel cannot come into contact with anything else.
If you tap your star with a hammer and it just crumbles to powder it is probably still moist. Dry stars are usually rock hard and rarely crumble easily. An exception to this rule is if you have a mix with large particles and insufficient binder.
The next test is to actually light a star (or number of stars) and see how they perform. You can perform a quick "ground" test by placing the star on a non-combustible surface such as a brick, stone, or cinder block and lighting it. For safety's sake do not use a regular match or cigarette lighter to light the star. I learned this the hard way when I literally burned my fingers. You can buy a variety of extra-length matches that are three inches long or even longer. Some charcoal lighters have a short barrel that keeps the flame a distance of about six inches (or even longer) away from one's hand. These are another good choice. They are inexpensive and are often sold in supermarkets.
Lighting a star on the ground can tell you if the star is dry enough, but does not give a clear picture as to how the star will perform when flying through the air.
The ultimate test for your stars is, of course, in the actual device you are using them in. However, it's good to know up front if you stars are likely to perform properly before committing a lot of time, effort, and perhaps money in making a lot of stars and loading them into your rockets, shells, mines or whatever else you are using them for. An easy way to perform such a test is to use a star gun. You can either purchase one or make your own. Star guns are great for testing your homemade stars.
8. Priming Again
Some fireworks makers prefer to prime their stars after they have dried out. Others choose to prime their stars only if the star gun tests or actual applications in devices such as shells demonstrate the need for prime. Fortunately it's an easy matter to prime dry stars.The trick in priming dry stars is to coat them with just enough solvent to cause the prime to stick to the star. This is rarely achieved by dipping the stars in the solvent. The best way to thinly coat the stars with solvent is to spray the stars with a misting bottle and using a fine mist. It's best to adjust the nozzle of the sprayer and test it on something other than the stars before spraying the stars. The wet stars are then primed as described before in step 5 and then dried following the normal drying procedure. As you are only drying prime, the drying process should be over quite quickly.
9. Using Cut Stars
Cut stars are typically used in shells, rockets, mines and fountains. You can find out more about these by following these links:Sizes of Cut Stars Used in Round Shells
Use Cut Stars in Mines
10. Safety and Other Matters
One very important safety rule when making fireworks is to clean up after you have finished your project. The preferred way to clean up scrap star mix is to burn it. This includes scrap that has stuck in small quantities to pieces of kraft paper, etc. Ensure that any burning is done in a safe manner where all the necessary precautions are taken to ensure that nothing else can be accidentally burned in the process.
The "Small is Beautiful" slogan applies especially in safety. The larger the amount of materials you are working with the less safe you are. Larger amounts mean more chance of having an accident and the greater the consequences of the accident. However, there are other issues you need to pay attention to. Large amounts of wet star composition can, depending on the circumstances, heat up and unpredictably create a fire. This has happened to more than one very experienced fireworks maker, resulting in severe-to-fatal burns! Don't let it happen to you.
Safety also applies to storage. Never store your stars or any other fireworks mixture in glass containers. Use paper, cardboard, or plastic bags. Do not mix different types of stars when storing them. "Small is beautiful" also applies to storage. The larger the quantity stored, the less safe it is. Also, ten pounds of stars stored in ten one-pound containers is safer than ten pounds stored in a single larger container.
It goes without saying that your stars must be stored in a place where they cannot be ignited from any source of ignition such as an open flame, a space heater, etc. Regardless of whether you have a BATFE license or not, you are legally required to store your stars in a magazine which conforms to BATFE regulations.
Star Frames Revisited
The just-described project showed you how to make cut stars using a particular type of star frame or no frame at all if you chose the method described in step 2. The star frame used in the project above had a bottom plate and a lid. Some star frames come with neither. Here are pictures of the star frame used in the project and some others.Shown in Figure 14 is the star frame described in the project. In the top left-hand side is the lid, followed by the frame and its bottom plate.

Figure 14 Star Frame Used in Project
Shown in Figure 15 is the "baby brother" of the star frame shown above. This star frame is smaller and its lid and bottom plate are identical.
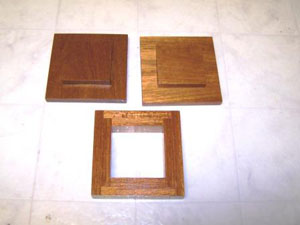
Figure 15 Smaller Star Frame
This is about the simplest star frame one can get. It has four sides with no lid or bottom plate.

Figure 16 Simple Star Frame
The star frame shown in Figure 16 is very simple and easy to make. Because it has no bottom plate or lid it requires a slightly different technique in making stars. One such technique is to cut two strips of kraft paper the internal width of the frame (5.5") and about 20 inches long.
Lay the pieces of kraft paper perpendicular to each other across the top of the frame so that their centers are in line with the center of the frame.
Press the centers of the pieces of paper down into the frame and scoop the star mix into the frame.
When all the mix is in the frame press it down so that it is flat as possible and then fold the pieces of kraft paper that are sticking out of the frame over the top of the mix.
Get a piece of two-by-four about eight to ten inches long and press down hard on the top of the mix, moving the two-by-four all over the frame.
Tap down hard on the mix with the two-by-four to compress it as much as possible.
Grab the frame and lift it so that the paper-wrapped "brick" of star mix slides out of the frame.
Pull the paper away from the sides of the brick and cut it into slices like one would do with a loaf of bread. Dice the slices into cubes as described in the project. ---Ian von Maltitz
Materials Needed
- Drying Screen
- Knife
- Mallet
- Mixing Bowl
- Mixing Spoon or Spatula
- One Gallon Zip-lock Bags
- Pyrotechnic Star Composition
- Rolling Pin (if a frame is not used)
- Rubber Gloves
- Scale
- Star Frame, Optional
- Waxed Paper